I hope you have read my description of batik separately before reading this (can be after). As batik is traditionally done on fabric we need to start here. Natural fibers with no sizing or synthetic fibers are best. I usually work with fine cotton in creating my hangings and framed pieces. Silk is also an elegant fabric to work with, but not one to learn with.
Before applying wax the fabric should be washed in hot water and professional detergent and thoroughly rinsed. When dry and smooth it can be tacked on a stretching frame. This can be canvas stretchers or a frame as is used for silk painting. I have two large boards with raised wooden sections at each end that I can tack the fabric on. These can be re-adjusted with canvas stretches in between for even smaller pieces. You can see larger batik images tacked to the stretching table, and also a very long one tacked to a higher board at the back of the table. Photos are included showing my table with an average size batik in progress as well as a large batik and an extra long batik in progress.
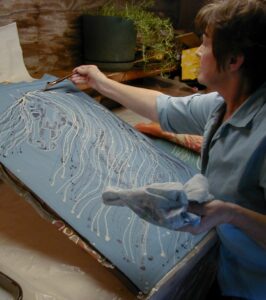
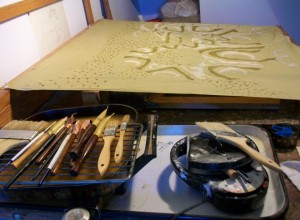
You will see the white fabric with a slightly darker area on this first stage of batik. This is where the wax has penetrated the fabric. Areas waxed on the fabric in this first stage will remain white throughout the stages of batik to come. Pictures of me applying wax are included. The tjanting tool is shown. This is a copper or brass bowl with a spout that is used to create lines. There are different size spouts available; small medium and large which make thinner or wider lines. The wax never stops flowing from the tjanting until it is empty or becomes too cool. You can see me holding a cloth or towel in my left hand which is there to catch drips from the tjanting when it is between applications on the cloth. Drips are permanent and wax is an unpredictable medium, spreading out as it feels, what happens must be worked with or discarded. Electric tjanting tools are also available, but I am not using one at this time. Wax is applied with many sizes and types of brushes. the brushes
need to have some quality to them but not be expensive as the hair can deteriorate in the heat of the wax.
There are many kinds of wax. I use a mixture of beeswax and paraffin wax. Pure beeswax will resist with no crackle (the veining that is seen in batik), pure paraffin the opposite, so much crackling as to have pieces falling off the fabric. I blend a little heavier with beeswax than paraffin and the mix can be varied to suit the artist. If more crackle is wanted, use more paraffin, if less, use more beeswax. Cold weather will create more crackle than summer. ( the freezer can be used to chill wax in the summer if lots of crackle is desired). Soy wax is another wax alternative. This is a vegetable wax and the smell from it is not toxic as paraffin is. It does not produce as crisp a line as the beeswax- paraffin mix. The dye slightly bleeds into it and produces a muted color, but not a bright white. It can be ironed out and also washed out using very hot water and detergent. ( Do not use your washing machine unless you have extremely hot water.) Synthetic “sticky wax” is also available as a substitute for beeswax. It is a bit cheaper and gives similar results.
I use an electric frying pan to heat the paraffin beeswax mix and hold the temperature where I want it to be. Wax is very flammable, so be sure to keep it at the proper temperature. beeswax 150 degrees, paraffin 145 degrees, sticky wax 175 degrees, and soy wax 150 degrees. I have a smaller melting pot pan for my soy wax mix. See photos. Bear in mind that different kinds of wax can be added to areas of a batik to provide varying effects. Do not heat over 250 degrees as this not only produces fumes, but can burst into flames. ( flash point). Should a fire occur do not fight with water, cover and smother and if that isn’t possible use a fire extinguisher for electrical or oil based fires.
When waxing always have good ventilation, a strong exhaust fan or out in a garage with a cross wind. To be safe ideally use a respirator mask. My studio has an exhaust fan to whisk the fumes up and away from my nose and out of the room. If the wax is not hot enough it will sit on the surface of the fabric and not penetrate enough to resist the dye. If it is too hot it will sizzle and bubble into the fabric and make a porous surface that dye will seep into.
In showing the wax applications in my photos, I have jumped ahead to show me applying wax after the first dye bath as well as on the clean white fabric of first wax. After you have applied the first wax areas please go to my tutorial on “Mixing Dyes.”


Trackbacks/Pingbacks